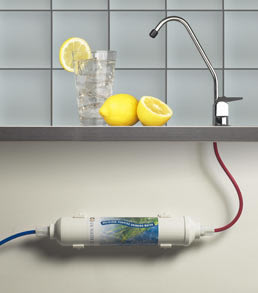
Instructions Installing In Line Undersink Water filter

NB Demo Pictures are supplied with the kit
There is no need to cut any pipes.
The kit is suitable for standard 12 to 15mm copper pipe
For safety locate your mains water STOP COCK before installing
TOOLS Required: Drill - with 12mm drill bit. Spanner or pliers
Select the position of the tap on your counter or sink unit.
TIP Ensure you have room underneath to connect filter to bottom of tap.
Drill a 12mm hole. TIP use a smaller drill bit first to make a “pilot hole”.
Remove nut from tap tail and push tap tail through hole, first making sure that the washers are fitted to tail as per photo. (Large chrome washer, large rubber washer then small rubber washer).
Now insert tap tail through the hole. Then secure the tap underneath the counter by using the other washers. (Small rubber washer, castellated washer then the nut). Use a spanner to tighten up the bottom securing nut.
Connect the spare plastic pipe to the bottom of the tap:
(IF NOT ALREADY CONNECTED)This is the pipe that is not connected to the saddle valve – (see 7 below).
Place the 2nd nut onto this tube, then the small white plastic “olive”. Push the tube up into the tap tail an inch or so. Now bring the nut up so that the white small white plastic “olive” is pressed into the tap tail. (This makes it water tight). Finger tighten this nut then secure firmly with at least one full spanner turn.
Position Your Inline Filter under your sink. Place the fixing brackets on the filter and choose a suitable positon (often this is attached to the side of the undersink cupboard). Mark with a pencil. Remove brackets from filter and screw into place
Connect the saddle valve to the cold water pipe. Finger tighten the clamp by turning the bottom nut. Then tighten properly with a spanner. NB Do NOT over tighten. One or two spanner turns after finger tight should do. Do not split your pipe ! The aim is simply to make the saddle valve immovable on the pipe.
Fitting Your New Filter
Take your inline filter and check flow direction is correct (see Flow arrow on the filter. Arrow points in the direction the water should flow ie to your tap).
Select your first tube end ie from tap or water connection. Take a plastic nut – see the small bag - and push your tube end through the centre ie so the nut is hanging loose on the tube.
Then push tube end into the fitting on the filter. Make sure it goes all the way in. It should be approx a centimetre. (Tip: Twist as you push it in).
Now slide nut down to the thread on the filter neck and screw nut onto the filter to finger tight.
If necessary tighten nut further with a spanner. Caution: DO NOT OVERTIGHTEN. ONE or TWO MORE TURNS with spanner after finger-tight should suffice.
Now repeat above procedure with other tube / other end of filter.
Flush the New Filter Through. Turn water supply to fridge back on and run water through for AT LEAST two minutes plus. This is to remove natural carbon dust and trapped air. When water runs clear it's ready to drink
Check for leaks when flushing AND double check for leaks 10 minutes later. Look for any tiny amount of leaking at the filter ends. If this happens redo fittings as above.
Any Problems? Please Telephone 0800 009 6611
Please note your feedback and any suggestions as to how we can improve our service are always appreciated.
That's it. We will send you a reminder to change the filter again in 6 months by email and post
Thank you
Sales Admin Team
Telephone 0800 009 6611
FREE SUPPORT
Need advice?
Please call us on
0800 009 6611
UK Water Filters Ltd
Unit D120
Parkhall Industrial Centre
London
SE21 8DE
UK Water Filters Ltd a Company Limited by Guarantee,
Registered in England,
Company Number: 05249436,
VAT Reg. No. 863 7634 91
Questions? Call us for friendly advice
Freephone 0800 009 6611


